MIMI-TORIA"S DESIGNS ONLINE Square Market Online Store

Showing posts with label Tutorial's. Show all posts

Sunday, April 17, 2011

Silver Handled Condiment Server Tutorial

The goods...
My as found piece of silver, which appears to be in the form of a vintage condiment server. Wash well with warm soapy water.  Dry thoroughly.  Measure the diameter of each of the cut out holes and write down, so you remember what size you are looking for when out shopping. :)
 Notice beautiful details on the handle.
For my particular silver piece I needed to purchase 5 glass containers that measured the same diameter as the holes.  I brought along my silver piece to the store the next time I was out running errands, so that I could be sure they would fit down in at the correct level.  I highly recommend you do the same, and plan to bring your item with you.  It saves time and $ now that gas is so high with returns if you buy the wrong size.
This photo shows how the glass containers should fit into your piece.
Let the fun begin...

Fill it with whatever your little <3 heart desires.

Be it M & M's for the chocolate lover...
condiments for your summer picnics...
jewelry on your dresser...
or like me
jewelry findings for my jewelry business.
Don't you just love easy tutorials????

Please share ~
What's your secrets to organizing smalls such as this?

Tuesday, April 12, 2011

Money Bag Tutorial

Here is a quick tutorial to make a handy money bag for using at your vendor shows you may be a part of this Summer.   So come along and join me in this quickie tutorial.


Acrylic paint in two colors, sponge stamp (your choice), two sponge brushes, 3/4" or 1" blue masking tape and as many canvas tool bags as you'd like to create.  I get mine at Home Depot for around .99 each, and love the fact that they already have the square shape already centered and on them.
Tape off around the orange "Home Depot" square with four pieces of blue painters masking tape, and overlap the pieces.  Be sure that you have the inside edges firmly pressed down around the edge, so that you obtain a crisp edge while painting and don't have any bleeding of paint.
Paint entire inside block with your choice of paint color.  I chose a dark brown shade to go with my European Vintage Style displays that I use for the events that I participate in.  You may need to paint on more than one coat, so don't rush to take of the tape. 
Now I have a nice crisp chocolate brown square space which has dried and is ready for the next step.  I have the paint wet on the stamp and ready to stamp on the square.  Be sure that you line it up in the middle of the square before carefully setting it down to stamp.  I was good with this on some, but my first one I wasn't successful with aligning perfectly in the middle.
Shown here is the stamp centered and ready to press down to imprint the stamping onto the brown square painted area.  You can see in this photo that there was some bleeding around the edges and this square isn't as crisp as the stamped square in the previous photo.
The finished product.  Notice that on this one the Fleur de Leis is a bit off centered?  It was the first one I did and I quickly corrected this mistake for the others I did.
My friend, Laurel, and I at the "Flea Market Under Glass" event in March 2011, in which I originally created the the money bag for this event.  
Here are the four money aprons completed and ready to be put into action at the FMUG event that I was a part of in March.  These come in handy for vending and keeping money on oneself at all times.  At another event there was a guy trying to make off with peoples money boxes, so it's always a good idea to keep your money on your body.

Thanks for following along with me.  I hope that some of my followers will find this tutorial useful to them.  You can always revise this project to meet your needs, but for under $2.00 each, I now have four of these money bags for use by my workers and myself at any of my upcoming shows.  Don't you just love useful and easy tutorials.


Linking up with White Wednesdays with Faded Charms link party.  Check out the rest of the blogs and their fun posts here.

*I originally saw this idea from my friend, Julie owner of "The Loft".  She made these for all of us vendors that were part of the original French Flea group to wear while working, and I instantly loved the idea.  There was a very limited amount of large stamp choices at Michaels Crafts and Direct, so I ended up using the same one she used.  She also added some sparkle to the edges of the squares and used black and silver for hers.  Mine are actually a chocolate brown and a metallic bronze color theme, so they are a bit different.

Friday, August 27, 2010

Heavy and Tough...All in a Days Work!

The story of a giveaway...
Necklace for Free
Yes, my blogging friends, you've heard me right.  A giveaway.  This is the first of three I'm offering in connection with Junk Bonanza event that is coming up in September.  I will be vendoring there Sept. 16-18 at Canterbury Downs in Shakopee and I hope to see you there. 

Do participate in give away #1.  Just head over to the Junk Bonanza Blog on Saturday and follow Jills' directions for entering to win this necklace made by me.

Now for the story of the necklace...

Count them, 1, 2, 3. Papa Bear, Mama Bear and Baby Bear all sizes of cash registers at my fingertips. A special thank you goes out to my dear friend, Carolyn, for snagging the two largest cash registers one day for me while she was out and about. She and her husband did a lot of the dirty work with taking these apart in their shop and allowing me to come and use their tools to finish dismantling them. As I say, they did quite a bit of the toughest work and then in addition to their time, I spent another 17 hours harvesting the cash register tags from these registers, filing them smooth, drilling holes, cleaning them, spraying them with a protective coating, and than they were ready to create with. Ahhh, the joy of working with junk elements...
Notice the gorgeous patina on the drawer of this cash register.
These registers were filthy to work on.  My friends even removed the mice nests before I started in on them.
Nice to have this warm, well equiped and well lit shop to work in.
I knew that these little tags would really become cool jewelry too.
So focused on the task ahead...
At last...the junk treasures removed.  Oh wait, at this point they all need to be cut apart with a bolt cutter, ground down with an industrial grinder, filed, holes drilled, washed, treated with a sealant so they don't make a mess on your customers clothes, and than at last one can design with them.

So why am I telling you all how to do this?  Because, I for one, am a jewelry designer that will not be harvesting cash register tags again in my lifetime to make jewelry with.  If you think its easy, have at it.  17 hours of work to get something to the point of designing with just isn't something I'm going to be doing again.  Been there...done that...  Let someone else have fun with it instead. ;)

Free Necklace

When my cash register tag necklaces are gone...they'll be no more.  Here's a few more that will be offered at the Junk Bonanza sale event.

Paris inspired in gold tones...
Paris inspired in silvertones...

Tuesday, April 27, 2010

Tutorial - Transforming a Window into a Business Sign

Welcome to my window transformation tutorial.  I will show you how to take an everyday tossed aside window and turn it into something once again useful and functional.
This is the finished sign.  I am a jewelry designer that recreates with vintage elements and was in need of a sign for my business when I do special events.  I will be participating in an upcoming event called AA/JMS here in Minnesota next week, with Sue Whitney, aka Junk Market Style owner.  I did a post about it here.  So when I found this great window at an occasional sale store, I knew I had to have it for this re purposing.
My window in its before state.  Loved the 4 slats of glass and thought words when I saw it.
I took extra foam core from another project and cut it into 4 strips to fit inside of the window panes.
At JoAnns' I found the perfect material for this project.  Kind of an oatmeal color with flecks of neutrals in it for texture, but yet smooth enough to paint on.  Used a 50% off coupon for the fabric and bought extra to also make some jewelry frame boards with the same material.
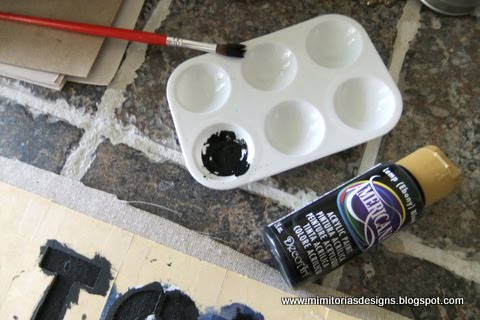
Tools of choice...paint palette, acryclic black paint, paint brush and stencils of choice.
I taped my stencils together to spell out my words ahead of time with masking tape and than made sure I had them even before starting to paint the letters.  I also taped this word down to the material to keep it in place.
It was time consuming, as I've a tendency towards perfectionism sometimes, but well worth the time and effort.  I didn't have any over runs of paint under letters, etc., which can happen if one rushes a job such as this.
My sign with just two of the sections completed.
Each of these panels fit in tightly, so they just pop in from the back side.  I however chose to carefully tack the individual panels in better with small nails.  I also trimmed off the excess material on the edges of the back panels too, which I do not have a photo showing.
Here's the sign hanging in our home, so that I could take a photo of it.  I am considering making four more panels with French words or something else that I like and use it in our home like that,  in between the special events that I would just normally get to use the busines sign for.  Just a thought!
Here I have the sign up at the AA/JMS event and waiting for the rest of my props and jewelry to get put together too.  I have a sale this Friday and Saturday at our French Flea shop, and than can get set up totally at the AA/JMS event for the May 5-9 sale.
I hope you enjoyed this tutorial and it maybe gave you some inspiration of what to do with a window you may have laying around the garage or basement.
Here is another window idea I did for our cabin decor with a six pane window.
I'm linking up today with:
Nifty Thrifty Tuesdays at Coastal Charm 
Transformation Thursdays at The Shabby Chic Cottage
White Wednesdays at Faded Charm Cottage
Its so Creative Mondays at Its So Very Cheri

Tuesday, April 13, 2010

Mannequin Make-over - from Ugly to Fun

This room is an inspiration (idea) room.  Part of a display in a local home that is an idea house.  I have been working in my mind on our master bedroom redesign and the colors you see here is very much what I've had in my plan.  However, the real inspiration piece I'd like to talk about today is the mannequin on the right in this photo.
You see last week, my friend, Carolyn had spotted this mannequin at a local antique shop and had given me a heads up about it.  The day I went to view it, the shop was having a storewide 20% off sale.  She was quite dusty, lop sided, wobbly and of needing some tlc.  I've been looking for mannequins to feature my jewelry for quite some time, and the price was quite good too.  Thus she is now part of my display props for my jewelry business.  However, she needed a make-over badly.  What to do?
Weapons of choice... I mean tools of the trade, used on my make-over.
I bought this Friday, and viewed the idea home on Sunday.  A light bulb moment for sure...
Do you see a resemblance between the two mannequins?  I did, so away I started to working on removing her ghastly overlay that was quite outdated.
Have you ever looked inside one of these ladies?  They are filled with hinges and screws.
I had to remove portions completely in order to fully remove the outer layers of fabric, but when I was done with each section, it was a small victory.  It took about 4 hours of tedious work to remove the fabric and put her back together again.
Here she is partially dismantled.
This photo shows all of the bluish/purple stretchy material removed, but the black fabric is still intact.  This is what I first thought I'd do, but I didn't like the condition (dirty) the black material was in.
I also didn't like how distracting the black fabric was when trying to photograph my jewelry, either, thus I began the process of removing the black fabric as well.
Here I'm removing the fabric.  The bent nose needle nose plier was invaluable, as was the scissor on most of the fabric removal.  I only used the exacto knife for removal of the black portion of fabric, as I already had the mannequin tightly fit together and would of had to take it all apart again without it.
Yeayyyy!  The finish results...and I'm quite happy with them.
My latest "White Wednesday" jewelry design.
Lots of fun details, and I'm loving photographing on this lady.
Beach theme necklace...
Lots of fun surprises and treasures make up this necklace.
More unique pieces collaborate to make this one of my all time favorite designs.
This is the back side portion of the necklace.  Details flow throughout the piece and is something I always strive to do with each of my one-of-a-kind designs.

Thanks for visiting me on this "White Wednesday" event and for taking the time to read my lengthy post.  The name I've chosen is Carolina, as my dear friend, Carolyn is whom found her for me.

This necklace, as well as others from my Mimi-Toria's Jewelry line will be available at the upcoming Remnants Of The Past event in California in Sue Whitneys booth.   The show is this coming week-end, April 24th from 9-4 pm in Nipomo, CA.    The remaining pieces will come back to Minnesota and be offered along with many other designs at the Arts+Architecture/Junk Market Style show/event being held in Minnesota in May from the 5-9th.  Check out the website and won't you plan to join us?  We'd love it if you can.

I am linking this up to Thrifty Tuesdays event, as everything used in this blog post was found while thrifting.  Thank you to Linda for hosting this fun event.
Thanks once again Kathleen of Faded Charm for hosting the White Wednesday party which I linked up to, and to Suzanne, the Colorado Lady, and her blog which I'm linking up to for the first time for her Vintage Thingies Thursdays she hosts.  Be sure to check out all of the rest of these blog parties participants, and leave a comment for them.
I am also linking up with Kristin Duke through her blog "The Idea Room".
Photobucket

Also, linking up with Trash to Treasure Tuesday for the first time.

Mimi-Toria's Design Jewelry Style